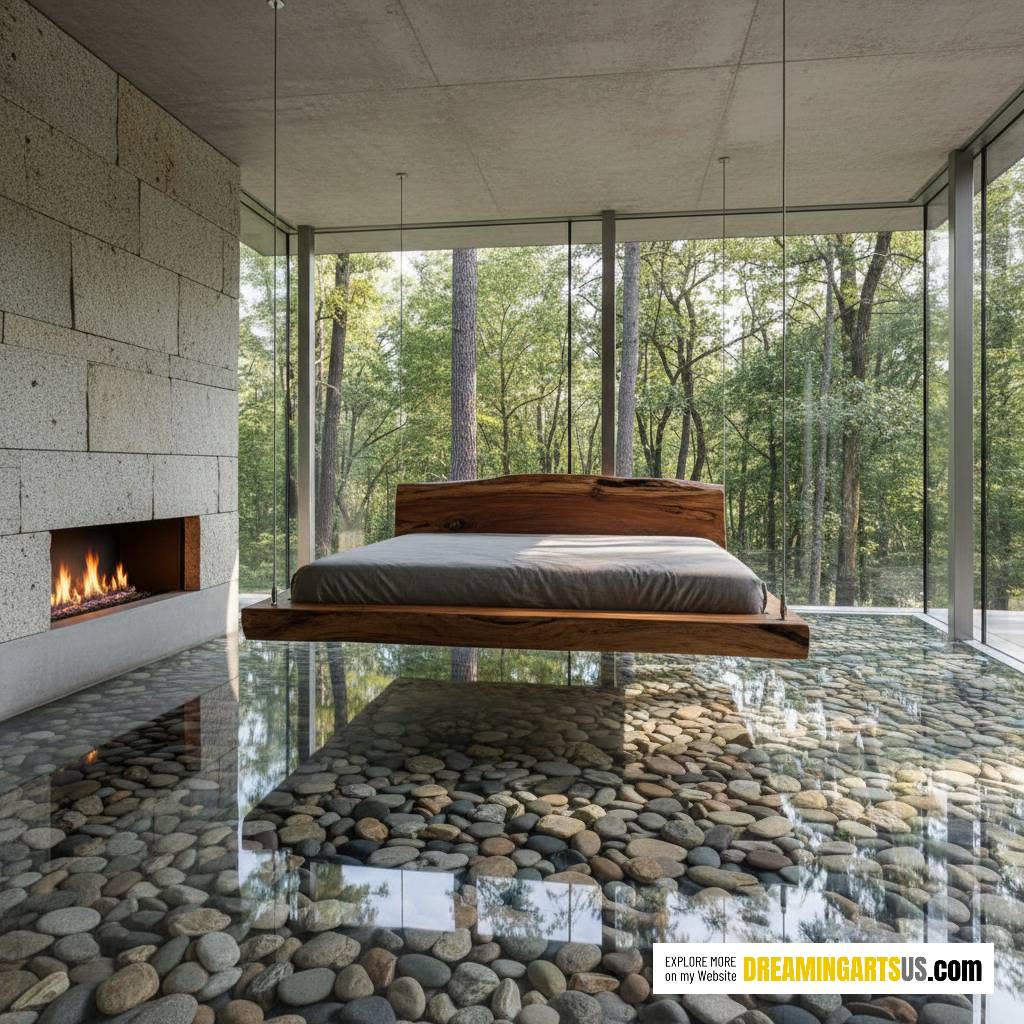
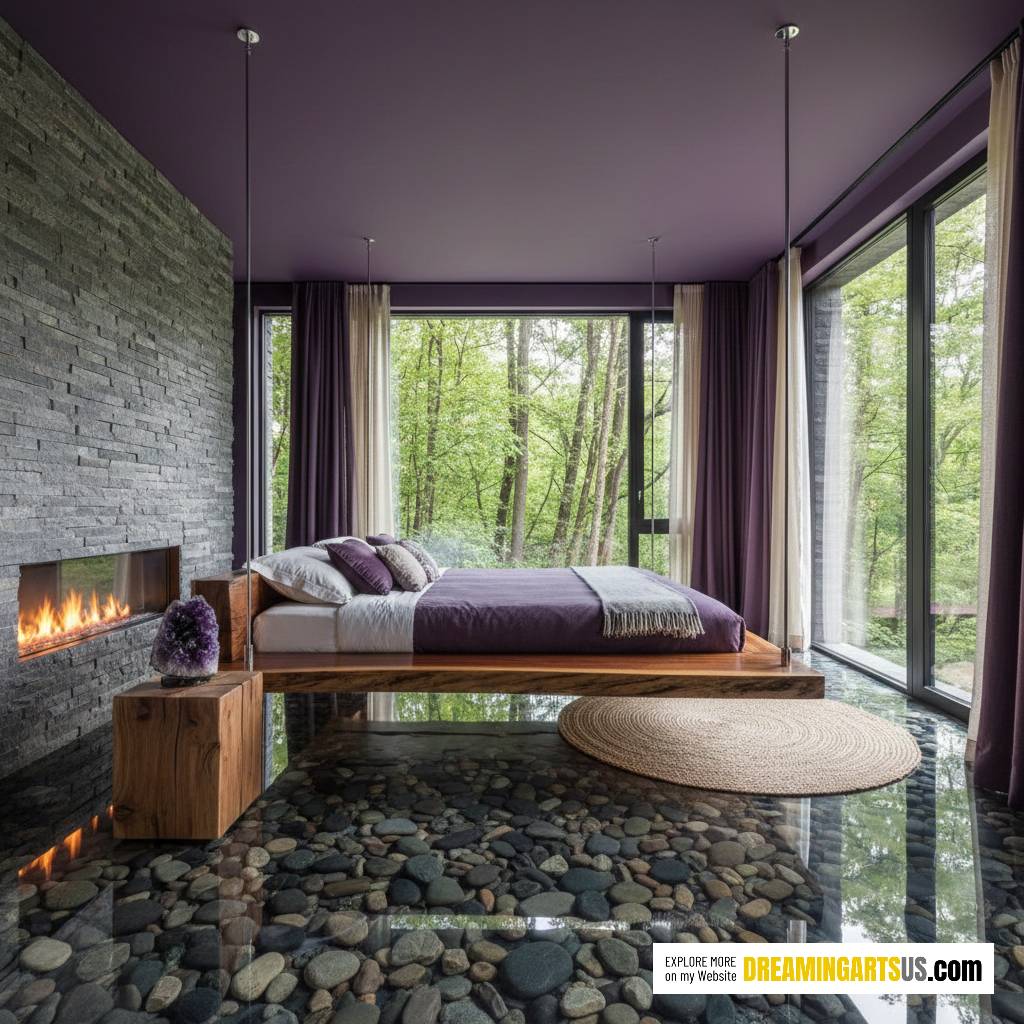
Installing an Epoxy River Stone Floor is one of the most transformative upgrades any DIY homeowner can take on. The mix of polished stones beneath crystal-clear epoxy turns an ordinary room into an artistic, nature-inspired retreat. Whether you’re upgrading a bedroom, bathroom, kitchen, or a sunlit lounge facing the outdoors, this flooring style creates a calm riverbed effect that feels both luxurious and grounding.
Thanks to advancements in epoxy formulations and stone-ready blends, installing your own river stone epoxy flooring is more achievable than ever—provided you follow the right steps and understand the nuances of the process. This guide walks you through every stage, from early planning to the final glossy finish, helping you avoid common mistakes and produce a floor that looks like a professional designed it.
Why the Epoxy River Stone Floor Has Become a DIY Favorite?
The rising popularity of the river stone epoxy flooring comes from its striking appearance and impressive durability. Homeowners love how it blends natural textures with modern craftsmanship, turning a simple foundation into a functional work of art. The stones create a soft, organic feel underfoot, while the epoxy resin seals the surface, making it waterproof, stain-resistant, and surprisingly easy to maintain.
For DIY enthusiasts, this project offers the perfect balance between creativity and hands-on craftsmanship. You get the freedom to choose your stone colors, patterns, and layout—whether you prefer earthy neutrals, dramatic dark river stones, or colorful mixes that catch the light.
Refer to similar product models: Click here
Tools and Materials You’ll Need
Preparing your tools before you begin will help the installation flow smoothly. For the best results, gather all materials in advance to avoid disruptions once the epoxy starts curing.
Essential Tools
-
Mixing buckets
-
Trowel or smoothing tool
-
Epoxy spreader
-
Heat gun or torch (to release bubbles)
-
Safety gloves and respirator
-
Level and measuring tape
-
Painter’s tape
-
Heavy-duty plastic sheeting
Materials
-
Two-part epoxy resin formulated for flooring
-
River stones (washed and pre-sorted)
-
Primer coat
-
Clear topcoat resin
-
Optional: pigment powders or metallic tints
-
Anti-slip additives (recommended for bathrooms or wet areas)
Since the river stone epoxy flooring is a permanent installation, choosing high-quality stones and resin ensures clarity, long-term durability, and consistent curing.
Step 1: Prepare the Subfloor Like a Pro
A flawless Epoxy River Stone Floor begins with meticulous surface preparation. Epoxy is unforgiving when it comes to dust, cracks, or uneven surfaces.
-
Sweep and vacuum thoroughly to eliminate dust.
-
Repair cracks using a cement filler or patching compound.
-
Ensure the surface is level—irregularities will show beneath transparent epoxy.
-
Remove any moisture. Epoxy does not bond properly to damp surfaces.
-
Use painter’s tape to protect walls, edges, and adjacent flooring.
Once the subfloor is clean and dry, apply your primer coat. This helps the epoxy bond securely and prevents air pockets from escaping into the stone layer later.
Step 2: Plan Your Riverbed Design
Before you mix any resin, take time to map out the artistic direction of your river stone layout. One of the biggest attractions of an Epoxy River Stone Floor is the ability to customize the pattern.
-
Organic river flow pattern
-
Ombre-style fades using stones of varying darkness
-
Bold borders that frame the room
-
Deliberate “puddles” of larger stones
Lay out your stones on the unprimed floor first to experiment with placement. Take photos from different angles to evaluate lighting and flow. This step ensures that once the epoxy is poured, you won’t need to scramble to fix design elements.
Step 3: Mix the Epoxy Correctly
Epoxy resin has a strict working time, so accurate mixing is essential.
-
Always follow the manufacturer’s ratio.
-
Mix slowly to avoid introducing excess air bubbles.
-
Use two buckets—mix in one, then pour into a second and mix again.
-
If using pigment additives, blend thoroughly for consistency.
When working on a large Epoxy River Stone Floor, mix batches strategically. Never attempt to mix more resin than you can apply within the curing window.
Step 4: Embed the River Stones
Pour a thin layer of epoxy onto the prepared subfloor. This base layer acts as the adhesive for the stones. Spread evenly using a trowel, leaving no dry patches.
-
Place stones gently—do not press too hard or the epoxy will rise unevenly.
-
Spread stones uniformly unless your design intentionally varies density.
-
Use a level frequently to maintain consistent height.
-
Consider mixing stones with epoxy in a separate bucket for easier placement in large rooms.
You’ll begin to see your Epoxy River Stone Floor take shape during this stage. The natural texture and tones of the stones bring depth, especially once the clear topcoat enhances them.

Step 5: Apply the Flood Coat
Once the stones are set in place, apply the flood coat—the clear epoxy layer that creates the signature glasslike finish.
-
Pour slowly in an “S” pattern for even distribution.
-
Use a spreader to guide the resin across the stones.
-
Apply a heat gun to remove microbubbles.
-
Avoid overworking the resin as it starts to cure.
The flood coat should fully cover the tops of the stones unless you prefer a tactile natural stone texture. Most homeowners, however, opt for a thick glasslike finish that enhances color and makes cleaning easier.
Step 6: Curing and Environmental Control
Curing is one of the most crucial phases of installing an Epoxy River Stone Floor. Any dust, temperature change, or vibration can affect the finish.
-
Maintain a stable room temperature (ideally 70–75°F / 21–24°C).
-
Keep pets and people out of the room for at least 24 hours.
-
Cover the area with plastic sheeting without touching the surface.
-
Full cure usually takes 48–72 hours depending on epoxy brand.
Do not rush this stage. A well-cured epoxy floor will maintain shine, clarity, and durability for years.
Step 7: Add the Final Topcoat
A final topcoat elevates your Epoxy River Stone Floor from visually stunning to professional-grade. This layer adds scratch resistance, UV protection, and long-term clarity.
-
Choose a UV-resistant formulation for rooms with natural light.
-
Add anti-slip powder for wet areas or high-traffic zones.
-
Apply with a roller using long, even strokes.
After the topcoat cures, your floor will have a smooth, glossy surface that mirrors light beautifully and highlights the river stones beneath.
Common Mistakes DIY Installers Should Avoid
Even skilled DIYers occasionally run into issues. Awareness of these pitfalls ensures a flawless installation:
-
Mixing too much epoxy at once — causing premature curing.
-
Skipping the primer coat — leading to delamination.
-
Not removing moisture — epoxy and humidity are incompatible.
-
Uneven stone spreading — results in high spots or visible gaps.
-
Poor bubble removal — which affects clarity and smoothness.
By taking your time and following each step carefully, you can avoid the most common issues and produce a professional-quality Epoxy River Stone Floor.

Maintenance Tips for Longevity
Once installed, your floor is incredibly durable. Still, proper care will preserve its beauty for many years:
-
Sweep regularly to prevent abrasion from small debris.
-
Use a gentle, non-acidic cleaner.
-
Avoid dragging furniture without protective pads.
-
Reapply a clear topcoat every few years if needed.
With the right care routine, your Epoxy River Stone Floor remains crystal clear, glossy, and vibrant long-term.
Where to Install an Epoxy River Stone Floor
This flooring style fits beautifully in a wide range of residential environments.
-
Bedrooms with floor-to-ceiling windows
-
Bathrooms needing water-resistant surfaces
-
Entryways and mudrooms
-
Modern kitchens
-
Spa-inspired home lounges
-
Sunrooms or enclosed patios
The natural stone aesthetic creates a seamless connection between indoor and outdoor spaces, making the entire home feel more organic and tranquil.
Estimated Cost Breakdown for DIY Projects
The cost of installing an Epoxy River Stone Floor varies based on room size, stone type, epoxy formulation, and whether you opt for premium additives.
Typical Price Ranges (DIY Installation)
-
River stones: $3–$6 per sq. ft.
-
Epoxy resin: $4–$10 per sq. ft.
-
Primers + topcoats: $2–$5 per sq. ft.
-
Tools + accessories: $80–$200 total
Total Estimated Cost
Most homeowners spend $9–$18 per sq. ft. for a full DIY installation—significantly less than hiring professionals, while still achieving a stunning result.
Refer to buy similar products: Click here
Is a DIY Epoxy River Stone Floor Right for You?
If you enjoy hands-on projects and appreciate the rewards of detailed craftsmanship, then installing an Epoxy River Stone Floor is a satisfying challenge. The process requires patience, careful mixing, and attention to environmental conditions—but the outcome is breathtaking.
Homeowners who appreciate natural materials, artistic interior design, and long-lasting finishes are the ideal match for this project. If you want a floor that stands out, tells a story, and enhances the visual depth of your space, this is one DIY upgrade worth taking on.
FAQs
1. How long does an Epoxy River Stone Floor take to install from start to finish?
Most DIY installations take 2–3 days depending on room size and curing times. The epoxy typically requires 24 hours for the base coat and another 24–48 hours for the topcoat to fully cure. Planning ahead ensures a smooth and uninterrupted workflow.
2. Can an Epoxy River Stone Floor be installed over tiles or wood?
Yes, but only with proper preparation. For tile, the grout lines must be leveled to prevent uneven resin pooling. For wood, ensure stability and seal the surface with a high-quality primer. A strong foundation is essential for long-term adhesion.
3. Is an Epoxy River Stone Floor slippery when wet?
A polished epoxy finish can become slick, especially in bathrooms. To improve traction, many DIY enthusiasts add anti-slip additives to the final topcoat. These maintain clarity while increasing friction for safer everyday use.
4. How durable is an Epoxy River Stone Floor in high-traffic areas?
Extremely durable. The natural stones resist wear, while the epoxy coating provides a protective barrier against scratches, stains, and moisture. With proper maintenance, your floor can remain pristine for 10–20 years or more.
5. Can I tint the epoxy to change the look of my Epoxy River Stone Floor?
Absolutely. Pigment powders, metallic additives, and color tints can be mixed into the epoxy to enhance the stones or alter the overall tone. Many homeowners use soft blues, amber gold, or charcoal grey to personalize the riverbed effect.
Installing an Epoxy River Stone Floor is more than a standard renovation project—it’s an opportunity to bring artistry and nature into your living space. With the right preparation, tools, and attention to detail, even first-time DIY enthusiasts can create a floor that looks like it belongs in a luxury architectural magazine.
The immersive riverbed effect transforms everyday rooms into serene, spa-like environments that leave a lasting impression on anyone who walks through your home. As long as you follow the steps outlined in this guide, your installation will shine beautifully for years to come.


