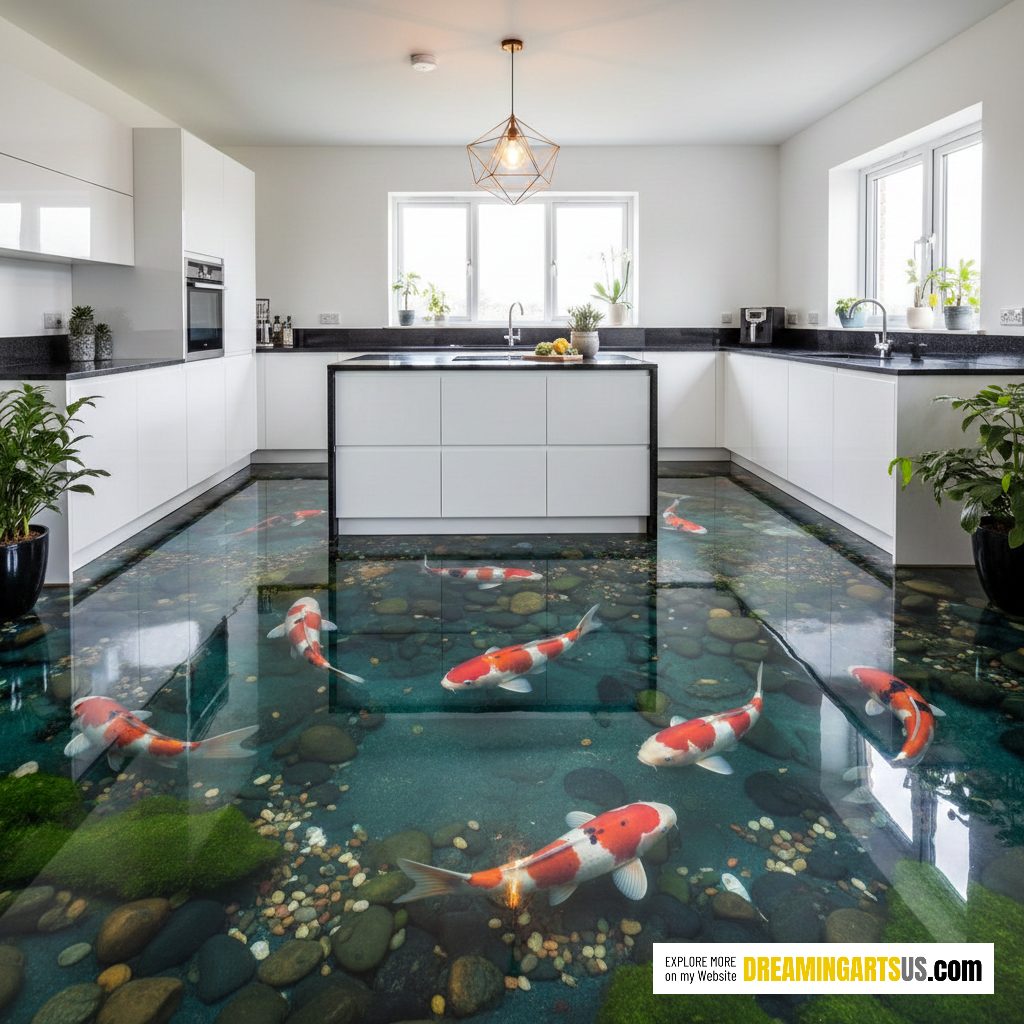
Imagine walking through your kitchen or living room while colorful koi glide gracefully beneath your feet. The soothing ripple of water, the shimmer of sunlight reflecting off scales, and the gentle hum of filtration together create an atmosphere that’s both luxurious and meditative. That’s the magic of a real Koi Pond Aquarium Flooring system — a living installation that transforms your floor into a vibrant, self-sustaining aquatic world.
Unlike 3D epoxy floors that mimic pond imagery, this design features a real water ecosystem built within your flooring. It’s a bold and beautiful idea that merges architecture, interior design, and aquatic life management into one masterpiece. This guide will walk you through how to plan, design, and install your very own Koi Pond Aquarium Flooring, even as a beginner.

What Is Koi Pond Aquarium Flooring?
Koi Pond Aquarium Flooring is an architectural feature where a functioning koi pond is seamlessly integrated into the floor structure of a home or commercial space. The top surface — usually made of thick, reinforced tempered glass or acrylic — allows you to walk above the living pond while observing koi swimming freely below.
It’s part aquarium, part flooring system, and entirely unique. Beneath the glass lies a carefully engineered pond complete with water, substrate, plants, filtration, aeration, and temperature control systems to sustain healthy koi life.
-
Aesthetic value: Nothing compares to the calm beauty of a real koi pond in motion.
-
Symbolism: In Asian culture, koi symbolize wealth, perseverance, and harmony.
-
Stress relief: The gentle flow of water and movement of fish create a peaceful atmosphere.
-
Property value: Adds luxury appeal and uniqueness to your space.
Installing Koi Pond Aquarium Flooring requires planning, patience, and a bit of technical knowledge, but the rewards are extraordinary.
Planning Your Koi Pond Aquarium Flooring
Before picking up any tools, proper planning is vital. You’re not just creating décor—you’re building a miniature ecosystem that must be structurally safe and biologically stable.
A. Choose the Location
Ideal locations include:
-
Living rooms or dining spaces with natural light
-
Indoor gardens or sunrooms
-
Covered patios or hallways
-
Spa or relaxation areas
Avoid areas with constant foot traffic where vibration might stress the fish, or spaces exposed to direct, harsh sunlight that can cause overheating or algae growth.
B. Determine Size and Depth
-
Recommended depth: 24–36 inches for koi comfort
-
Surface area: Minimum of 50–75 gallons of water per adult koi
-
Weight consideration: 1 gallon of water weighs about 8.34 lbs—so a 500-gallon pond equals over 4,000 lbs. Your flooring must be structurally reinforced.
Consult a structural engineer to ensure your floor can safely support the pond’s weight and glass surface.
C. Conceptualize the Design
You can design your Koi Pond Aquarium Flooring in various styles:
-
Central island pond: A large glass-covered pond as the room’s focal point.
-
Perimeter pond: A border design running along walls or under seating.
-
Walkway pond: A narrow, elongated pond with stepping areas above.
Add decorative stones, aquatic plants, and soft LED lighting for a mesmerizing visual effect.

Materials and Tools You’ll Need
Structural & Aquarium Materials
-
Reinforced concrete or fiberglass pond basin
-
Tempered glass or thick acrylic panels (minimum 1–1.5 inches thick)
-
Rubber pond liner (for waterproofing)
-
Filtration and pump system
-
Water heater or chiller (for temperature control)
-
Aeration stones and air pump
-
LED lighting (waterproof, aquarium-grade)
-
Substrate and aquatic plants
Tools
-
Masonry tools (for concrete shaping)
-
Silicone sealant (aquarium-safe)
-
Leveling tools and measuring tape
-
Drills and fasteners
-
Electrical supply for filtration and lighting
Links to purchase similar products: Click here
Construction Steps – Koi Pond Aquarium Flooring
Here’s the full beginner-friendly process to create your real Koi Pond Aquarium Flooring.
Step 1: Prepare the Foundation
Start by marking your chosen pond area and excavating or framing the base.
-
Ensure the depth is uniform and that drainage or plumbing lines are accessible.
-
If on an upper level, consult a professional to design the proper support beams.
-
Apply a waterproof pond liner or fiberglass coating to prevent leaks.
The foundation must be absolutely level and free of sharp debris.
Step 2: Build the Pond Walls
Use reinforced concrete or prefabricated fiberglass panels for the pond walls.
-
Add internal supports to prevent bowing from water pressure.
-
Smooth the interior with non-toxic, waterproof sealant.
Allow 2–3 days for curing before filling or adding components.
Step 3: Install Filtration and Aeration Systems
A healthy koi pond relies on a strong filtration setup. Install:
-
Mechanical filter: Removes debris and waste.
-
Biological filter: Supports beneficial bacteria that break down toxins.
-
Pump: Circulates water through filters continuously.
-
Aeration stones: Ensure oxygen flow for koi health.
These components are usually hidden within the floor cavity or a side cabinet, connected via PVC tubing.
Step 4: Add Electrical Components
You’ll need:
-
Lighting system: Waterproof LED strips to illuminate the pond.
-
Temperature control: Heater or chiller depending on climate.
-
Backup power: Optional battery or generator for filtration continuity.
Run all electrical lines through waterproof conduits and consult a licensed electrician for safe installation.
Step 5: Install Glass or Acrylic Floor Panels
This is the defining element of your Koi Pond Aquarium Flooring — the transparent walking surface.
-
Measure exact dimensions and order pre-cut, tempered glass panels rated for load-bearing.
-
Add a thin silicone gasket or rubber padding along the pond rim for shock absorption.
-
Carefully lower the glass or acrylic sheets into place using suction grips.
-
Seal the perimeter edges with aquarium-safe silicone.
Tempered glass provides better clarity and scratch resistance, while acrylic is lighter but more prone to surface scratches.
Step 6: Fill the Pond and Cycle the Water
After installation:
-
Fill the pond with clean, dechlorinated water.
-
Run the filtration system for 5–7 days before adding fish.
-
Test pH levels (ideal range: 7.0–8.0).
-
Check temperature (68–75°F or 20–24°C).
-
Monitor ammonia and nitrate levels.
Cycling allows beneficial bacteria to stabilize, creating a safe environment for koi.
Step 7: Add Substrate and Decorations
A natural-looking environment enhances both aesthetics and koi health.
-
Add smooth river stones or pebbles to the pond bottom.
-
Include live aquatic plants such as anubias, water lilies, or hornwort.
-
Avoid sharp decorations that could harm fish.
-
Install gentle LED lighting for nighttime illumination.
Step 8: Introduce the Koi
Once water conditions are stable:
-
Float sealed koi bags in the pond for 15–20 minutes to equalize temperature.
-
Slowly release them into the pond.
-
Observe for stress signs like frantic swimming or gasping.
Feed sparingly at first, ensuring filtration can handle the new biological load.
Koi Pond Aquarium Flooring: Essential Maintenance Tips
To keep your Koi Pond Aquarium Flooring looking crystal-clear and your koi thriving, follow these regular maintenance practices:
Daily
-
Check water clarity and filter flow.
-
Observe koi behavior and appetite.
Weekly
-
Test pH, ammonia, and nitrite levels.
-
Clean surface debris using a net.
Monthly
-
Perform 10–20% water changes.
-
Rinse filter media gently (avoid tap water—it kills beneficial bacteria).
-
Inspect seals, lighting, and glass integrity.
Seasonal
-
Adjust temperature controls during summer and winter.
-
Trim aquatic plants to prevent overgrowth.
-
Deep-clean pump and filtration lines.
Regular care ensures both beauty and fish health for years to come.
Safety Considerations
Because this installation combines water, electricity, and load-bearing glass, safety is crucial.
Structural Safety
-
Reinforce subfloor beams to handle full water weight plus occupants.
-
Use only tempered or laminated glass rated for at least 800 kg/m².
-
Include anti-slip coating or etched glass texture on top.
Electrical Safety
-
Always use GFCI outlets.
-
Keep cords and plugs above waterline.
-
Schedule regular inspections by a qualified electrician.
Fish Safety
-
Never use cleaning chemicals near the pond.
-
Maintain stable temperature and pH.
-
Provide shaded areas or floating plants to reduce stress.
Enhancing the Visual Experience
A real Koi Pond Aquarium Flooring is already stunning, but thoughtful enhancements can elevate it even more.
A. Lighting
-
Install dimmable LED strips under the glass to mimic sunlight.
-
Use soft amber or blue tones at night for a tranquil glow.
B. Landscaping
Surround the pond with bamboo, bonsai, or small stone arrangements for a Zen-inspired aesthetic.
C. Smart Integration
Add remote-controlled lighting and temperature systems that sync with your smartphone or home automation setup.
D. Acoustic Ambiance
Add a hidden mini-waterfall or bubbling sound feature for soothing background audio.

Costs and Budget Planning (2025 Estimate)
Building a real Koi Pond Aquarium Flooring is a premium home feature, and costs vary by design scale and materials.
| Component | Approximate Cost (USD) |
|---|---|
| Pond Basin Construction | $1,000 – $3,000 |
| Tempered Glass or Acrylic Panels | $1,500 – $4,000 |
| Filtration & Pump Systems | $800 – $2,000 |
| Lighting & Electrical | $300 – $1,000 |
| Heating/Cooling Equipment | $250 – $700 |
| Structural Reinforcement | $1,000 – $2,500 |
| Koi Fish (5–10 healthy specimens) | $300 – $1,200 |
| Plants, Stones, Décor | $150 – $400 |
| Estimated Total | $5,000 – $12,000 |
For professional design and installation, add 20–30% to the budget.
Link to buy similar products: Click here
Troubleshooting Common Issues
Even a well-built Koi Pond Aquarium Flooring can experience issues over time. Here’s how to handle them.
| Problem | Cause | Solution |
|---|---|---|
| Cloudy water | Overfeeding or poor filtration | Reduce feeding, clean filter |
| Algae bloom | Too much light or nutrients | Reduce sunlight, use algae control |
| Koi scratching or gasping | Poor water quality | Test and adjust pH or oxygen |
| Leaks | Damaged sealant | Drain partially, reseal with aquarium silicone |
| Scratched glass | Abrasive cleaning tools | Use soft cloths and polish for restoration |
Consistent care and monitoring prevent most long-term damage.
Environmental and Ethical Considerations
Koi Pond Aquarium Flooring is more than an aesthetic addition; it’s a living ecosystem. Responsible pond owners respect the needs of their koi and the environmental impact.
-
Source koi from reputable breeders who avoid overcrowding.
-
Avoid dumping untreated water into outdoor drains.
-
Use eco-friendly filtration and minimal energy systems.
-
Never release koi into natural bodies of water.
By treating the pond as a balanced habitat rather than decoration, you ensure sustainability and ethical stewardship.
Benefits Beyond Beauty | Koi Pond Aquarium Flooring
A real Koi Pond Aquarium Flooring offers advantages beyond design appeal:
Emotional Health
Studies show that watching fish swim lowers stress and anxiety, promoting mindfulness.
Acoustic Comfort
Running water gently masks household noise, creating a calming soundscape.
Air Quality Improvement
Evaporative moisture from the pond helps maintain indoor humidity, beneficial in dry climates.
Symbolic Prosperity
In feng shui, koi represent success and abundance — ideal for home or business spaces aiming to attract positive energy.
A real Koi Pond Aquarium Flooring is more than an interior design project — it’s a living symphony of water, color, and motion that invites tranquility into your daily life. While the installation requires careful planning and professional input, even beginners can oversee the process successfully with this guide.
From the first blueprint to the moment your koi explore their new underwater home, every step brings both artistry and connection to nature. With proper care, your koi pond floor will not only mesmerize guests but also enrich your well-being for decades.
So take the plunge — design thoughtfully, build safely, and nurture your koi with patience. The result will be a masterpiece beneath your feet: a serene aquatic world where architecture and life coexist beautifully.


